Friday, June 29, 2012

Adventures in Cleaning Blinds

Ahhhhh, yes!  An extremely exciting topic here....NOT!  :)   The very last thing on my "to do" list from last year (yes, you heard right - last year) was to clean the blinds in my house.  It was going to be a big task because in the 3 years that I've owned my home, I have never cleaned them.  Yeah, I know, I know, but don't be disgusted with me, ok?  Actually, when I first got the house, they were already pretty dusty and back then, I had no idea about all these helpful cleaning tips, so I tried cleaning them with a household cleaner I had with paper towel.  Well, let's just say that I got through about 1/2 of one of the blind sets and stopped because I went through a lot of paper towels and it didn't seem to be cleaning very well.  I decided that I finally needed to get this done because I have guests coming for a week-long visit in a a few weeks and well, it's just a good excuse to finally get some of this stuff done that I've been procrastinating on.

So, I found this cleaning tip for blinds on Pinterest.
Via Keep Home Simple blog

Now, I know white vinegar is great for cleaning (it has worked wonders for me), but I also hate using it because I cannot stand the smell of vinegar.  Blech!  But, I gave it a shot - especially because one of the sets of blinds had a bunch of spots all over the back side.  Let's check out some before pictures (this was all done at night, so please don't mind the night time pics).

It's sort of hard to see in this picture, but the dust was pretty bad (you can see some finger marks there).  This is the set in the master bedroom.  I did the first 4 slats the exact way that the link states to.  I didn't feel like it was doing anything special, plus the wet sock on my hand was driving me crazy (and boy, did that vinegar smell stay on my hand for a couple of days) - it was like a puppet show gone wrong.  So, I decided to try a different route and it's what I ended up using for all the blinds.  I took each slat out from the strings and just used a mixture of water and Dawn with a sponge and wiped both sides of the slat down (the tougher spots got a good scrubbing).  I then made sure to dry them off with a towel and slid them back in the slots.  Easy!  I did notice that there was some sun damage to many of the slats - some of them were yellowed in areas.  Hmmm - maybe spray paint would do the trick?  Although, that sounds like a pain in the booty to spray paint all of those.  I think I can live with them as they are.  :)

Here are the after pictures - much better!

The guest bedroom blinds had a bunch of spots on the back.
At first I thought it was some kind of mold, but I found another similar spot on these blinds and it was in the shape of finger prints.  So, I think it was some kind of oily/greasy substance that got on the blinds, never was cleaned, and then the dust just stuck to the spots like crazy.  For the spots, I actually dabbed the Dawn on them directly and for the most part, the spots came out.  Some spots, you can still see, but only very lightly.
Tons better - you can't even see the spots anymore in the picture.

So, what did I learn from this?  #1  Water & Dawn seemed to do the trick.  #2  I have resolved to give the blinds a good dusting with my Swiffer once or twice a month so they don't get this bad again.  YAY!  Another thing checked off my list and I'm officially done with my 2011 list.  :)

Thanks for stopping by!
Posted by http://adventuresindiy1759.blogspot.com/

Thursday, June 28, 2012

Summer Wreath

Hey there!  I hope everyone is enjoying their summer so far.  It's been pretty warm here in Southern California.  We didn't get much of a winter, so I'm thinking that the summer heat is only going to get worse.  And I am dreading that!  Typically, the extreme heat just sucks the energy out of me, but so far, I've had tons of motivation to get things done around here.  That's why I've been a bit M.I.A. on the bloggy blog.  I've mostly been doing the boring stuff:  painting, cleaning baseboards, cleaning blinds (and more painting to come).  Nothing terribly too exciting.  But, I did manage to get a crafty project done and now I'm finally getting to this post.    Whew!  ***Please see my updates near the end of the post***


I saw this great summer wreath on Sand and Sisal's blog this month.  I pinned it right away and knew I had to make something similar very soon.  So, after I finished painting my interior doors, I gathered up my supplies and made it.  Here's a how-to for you...

Supplies Needed:
*  Pool toy noodle
*  Duct tape
*  Beach decor of your choosing
*  Rope and or jute  
*  Hot glue & glue gun

1)  As you can see in the picture above, you'll need to form a circle with the noodle and then use duct tape to tape them end to end. (I got my noodle at the Dollar Tree)

2)  Get your rope and/or jute and start hot gluing away (I started where the duct tape is).  I already had sisal and jute on hand, but not enough of both, so I alternated.  My stepmom, Liz, suggested it and boy, is she a smartie!  So, you just wrap, wrap, wrap, glue, and repeat.

3)  And keep wrapping.

Until you get this.

4)  I made felt & dropcloth flowers in beachy-type colors using this technique by Home Stories A to Z (she included a great video tutorial).

5)  I then hot glued a starfish, sand dollar, a couple of driftwood pieces, and my felt flowers to the bottom of the wreath. 

6)   I added pretty aqua colored ribbon to hang the wreath from.
Oh. My. Word.  I knew my security screen door was bad, but geez louise!  That's bad.  (I will be putting in a new entry door next month and this screen door may be going bye bye too).   Please ignore it and just look at the pretty wreath.  Wait!  Here's a better shot.

Originally when I made the wreath and hung it up on the door, it hung in an egg shape.  I was not happy with it - I tried to deal with it for a couple of days, but it bugged me.  It turns out it was hanging that way because I hung it from the part where it was duct taped.  So, I took everything off and flipped it 180 degrees and re-glued everything. It was a pain and although it doesn't hang like a circle (the rope is too heavy for the foam noodle), it's much better in this new oval shape than the egg shape.  

Thanks for taking a look and bearing with my silent moments on the blog this month.  Ok, now back to more blinds-cleaning for me.  

***Update:  I noticed that over time, my wreath kept sagging into an oval, oblong shape.  It appears that the pool noodle couldn't withstand the weight of both the sisal & jute.  I would suggest that you use a more substantial wreath form for this project and save the pool noodle for a wreath that uses lighter material (like for yarn or fabric).  I bought a straw wreath form, so I'll be re-doing this wreath soon.  With all the hot glue used, this will not be an easy task, but I really love this wreath.***
***Update #2:  To see how my wreath looks now, click here.***

Linking up to:


Our Thrifty Ideas Tutorial Tuesday link party


Homework's Inspiration Board link party


Delightful Order's Delightfully Inspiring Thursday link party

One Artsy Mama's Shine On Fridays link party and Happy Go Lucky's Shine On Fridays link party

Thrifty Decor Chick's July  Before and After Party

Posted by http://adventuresindiy1759.blogspot.com/

Monday, June 25, 2012

Updates & Goings-on

Hello - I'm back, up & running!  In my last post, I mentioned that I wasn't able to write the new post I wanted to because my trusty 'ole Macbook's memory was almost full.  Well, tonight, I backed it up on the external hard drive, burned pictures onto CDs and deleted a lot of those pictures off of my computer.  So, I'm back in business (for now).  I will probably have to get a new Macbook somewhere in the near future - mine can only hold 2GB (and that was with me putting the max amount of extra memory my computer will hold), while the newer ones hold double the amount or more.  My Macbook has served me well (knock on wood) and yes, they are expensive, so I'm getting the most out of this baby that I can.

The last several weeks have been very busy.  I worked on my Interior Doors project and completed that a week ago.  And once I was done with that, I had to get the house in order for a BBQ I had this past Saturday.  Right now, my living room, dining room, and kitchen look good, but I kind of threw some stuff into my craft room & garage, so I'll have some re-organizing to do.  Anyhoo, since I've been so busy, I took the time today to just relax, take naps, watch TV, and caught up on blog reading.  I've been go, go, going, that it's been awhile that I've had a chance to just chill out.   Here's a quick picture from my BBQ.
Hilarious, right?  There was a mishap with the BBQ.  It sort of, well, caught on fire, but it wasn't serious and we were able to get the fire out pretty quickly.  But, the first batch of burgers didn't survive.  RIP.

I also wanted to share a couple of pictures from So Long Davey!'s performance at the Del Mar Fair in San Diego last weekend.  My brother is the lead singer and they are pretty awesome.  And my brother has tons of crazy energy - you should see how high he can jump!  I'm always amazed when I see him jumping around on stage and that is one of my favorite parts of their shows!  Their performance was part of a contest to win $5000.  Unfortunately, they didn't win first prize, but they did win a brand-new Taylor guitar, which is pretty darn cool!


A few weeks ago, I also was able to go to the Cast Member (employee) preview of the new Cars Land at Disney's California Adventure before it opened to the public.  I posted about it here.  I updated that post with two pictures from that day (they didn't allow any photography or videos, but had their Photopass photographers available to take pictures that would be available once Cars Land was opened to the public), so you can click on over to that post to see them.  I'll also be writing a review of it as well since I can give more details now.

I have a post coming up for you shortly and have some other projects I'll be starting up soon.  I've had the motivation to get these bigger projects done, so I need to do them while I'm motivated or they will never to get done.  That's how I roll.  :)

Thanks for stopping by!
Posted by http://adventuresindiy1759.blogspot.com/

Thursday, June 21, 2012

Stay Tuned...

I'm still slacking in the blog post-writing department.  I spent Father's Day weekend in San Diego visiting with my dad.  We had a great time watching my brother's pop-punk band, So Long Davey!, play at the Del Mar Fair.  You should click on the link and check them out - they are pretty darn awesome!  Anyhoo, after I got home, I had to clean up the mess from when I painted the interior doors.  This week, I've been cleaning up and trying to get everything ready since I'm having a BBQ this weekend, so haven't had too much time to do much else.

I was going to write a post today.  Well, technically I am writing a post.  Ahem.  What I mean is...I had intended to write a post about a crafty project I did the other day.  But, when I attempted to upload the pictures, I wasn't able to.  I have an older Macbook (about 6 years old) and it doesn't have as much memory as the newer ones.  I even installed more memory awhile back, but wasn't able to put in as much as the newer Macbooks allow.  So, every once in awhile, I have to clean it out.  And apparently this is one of those times.  So, I'm not able to write my post until that happens.  After this weekend, I'll have a bit more free time for posting and projects.  I will be having company in July for a week, so I'm planning on doing more sprucing up around here.  :)

Thanks for hanging in there and stay tuned...

P.S.  I was going to at least include the other picture from when I went to the Cars Land preview at Disney's California Adventure a couple of weeks ago as seen in this link, but the Disney PhotoPass website it down right now.  I just can't win for losing tonight!  So, I'm including the picture that I already updated to that post in case you didn't see it yet.  And here's a thought - I just might write up a post to give my review of the new Cars Land.  Hmmm...

Posted by http://adventuresindiy1759.blogspot.com/

Wednesday, June 13, 2012

Interior Doors: Part 4

Click on the links to see Part 1 of this series in which I explain how to remove painted-on screws & hinges, Part 2 of this series in which I explain how to strip paint off of hinges, and Part 3 in which I spray painted the hinges and installed them.

Before painting the doors, they needed a very good cleaning.   It seems the previous homeowners had a kid that like to write on the doors with crayons.  Every.  Single.  Door.  (Since the doors were off the hinges, I put them on saw horses while working on them).  I tried using a paste made with baking soda & water, but that didn't work.
(Sorry that some of the pictures are bad.  I did most of the work at night after work).

Magic Erasers did the trick with cleaning the doors.

After cleaning the doors, I wiped them down to remove any excess water and let them dry for a bit.  I also taped off any hardware I couldn't remove.  I used tin foil on the handles (a great idea from Pinterest!).

I then painted two coats of Behr's Ultra Pure White satin on one side of the door and let it dry overnight and all day.  The next evening, I would flip the door over and paint two coats on the other side and let it dry.  Afterwards, I painted any trim in the doorways that still needed it and let it dry overnight and all day as well.  Then on the next day, I put the hinges back on the door and also included a hinge-pin door stopper.

It was then time to hang the door back up.  I propped it up using books and magazines to get it to the right height and matched the hinge on the door to the spot on the doorway and just screwed them in - fairly easy.

Here is one set of doors after I was finished with the whole process.  The doors look so much cleaner and they really brighten up the entire house!

Here is a side by side before and after of two of the doors.
Again, it's not the greatest picture because it was taken at night, but you can see how much better the door on the left looks compared to the door on the right.

Although it was a bit of a long process (over 2 weeks - it took me awhile to get my flow down, plus you can't speed up dry time for paint), it was completely worth it!  I still have to paint the linen closet in the hallway and the interior part of the french doors, but this part of the project is officially d-o-n-e, done!

Linked to:
Thrifty Decor Chick's July Before and After Party

Thanks for stopping by!
Posted by http://adventuresindiy1759.blogspot.com/

Saturday, June 9, 2012

3-Tiered Stand

I'm still working on the interior doors (unfortunately, you can't speed up the drying time for paint!), however I did manage to squeeze in a crafty project while waiting for the paint to dry.

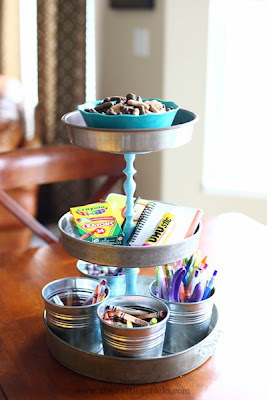
I've been eyeballing 3-tiered stands for awhile now.  I've seen various versions (including the ones with baskets) and most I have seen at different stores were at least $20.
Source
I really like the version in the picture above and knew I could make my own - they seemed simple enough anyways.  So, I gathered up some materials and tried my hand at it.  Here's a quick tutorial in case you want to try it on your own.

Supplies needed:
* 3 pie or cake pans in various sizes or all the same size ($1 each at the Dollar Tree)
* 2 candlestick holders ($1 each at the Dollar Tree)
* Glue ($4 at Home Depot)
* Spray paint in a color of your choice (already had on hand)

1)  I primed the candlestick holders with spray paint before painting them.
By the way, the trigger for the spray paint cans shown above is the best $6 I've spent!  It makes spray painting so much easier.  You can find them at Home Depot.

2)  After letting the primer dry, I sprayed them in my favorite Aqua color.

3)  The glue I bought is Liquid Nails "Perfect Glue".  I made sure that it would be ok to use on glass, but it's also good for all different types of surfaces.  I put the glue on the bottom & top rims of the candlestick holder (depending on which part of the tier I was doing) and adhered them to the pie pans.  I did one tier at a time and used a book or two to sit on top of it to help add weight during the drying time.
**As a side note, I stalked the Dollar Tree for months to try to find 3 different sized cake pans.  They only had one size.  So, I decided to just use the same sized pie pans for all 3 tiers and it looks just as cute.

4)  And here is the final product!

I'm not sure where I'm going to use it or how I will use it (I'm thinking either the kitchen, bathroom, or craft room), but I can always make another one with cake pans or small bowls and different color spray paint and have them in different rooms.  This project ended up costing me $9 to make, so I saved $10!  And I have leftover glue to make more if I decide to.  I really love how it came out.

Thanks for stopping by and have a great weekend!

Linking up to:
Creatively Living's Tell It To Me Tuesday link party


Home Stories A to Z Tutorials & Tips link party

Our Thrifty Ideas' Tutorial Tuesday link party

The NY Melrose Family's Whimsy Wednesdays link party

The 36th Avenue's link party

Live Laugh Rowe's Live Laugh Linky link party

One Artsy Mama's Shine On Fridays link party


Too Much Time's Get Schooled Saturday link party

Thanks for stopping by!
Posted by http://adventuresindiy1759.blogspot.com/