
Supplies needed:
* Fabric (I used a canvas drop cloth I purchased at Home Depot)
* Iron-on transfer paper
* Printer
* Iron & ironing board
* Sewing machine & thread matching your fabric
* Polyfiber fill
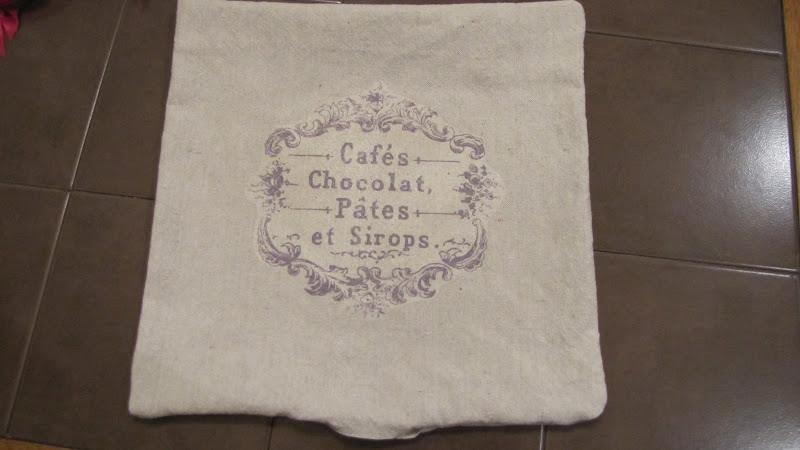
1) First, find an image that you want on your pillow. If the image has words, make sure to print the mirror image (when you iron it on, it will come out the correct way). This is what the mirror image will look like.
 |
| Via The Graphics Fairy |
2) Next, print your image on iron-on transfer paper. I bought mine from Walmart in the office supplies section. I wasn't sure if it would work with my printer (I use an HP Photosmart printer), but it ended up working like a charm.

3) I cut two squares out of leftover canvas painter's drop cloth that I had previously purchased at Home Depot.

4) I followed the directions that came with iron-on transfer paper. They suggested to use a pillow case underneath, so that's what I did. I then trimmed the paper around the graphic and placed it where I wanted it to go on the fabric.

5) Then, I used the iron and ironed on top of the paper onto the fabric. I made sure to apply lots of pressure.

6) Once it was time, I slowly pulled up on the paper, making sure that the image stayed on the fabric. They suggested that if it didn't completely transfer, to just iron it again and apply lots of pressure. Mine came out perfectly - I just made sure to slowly pull off the paper, little by little.

7) I turned over the piece of fabric that had the image ironed onto it, placing it on top of the other piece of square fabric (right sides in) and pinned them together. Sew up all the sides leaving a section open so you can stuff it.

8) I turned it out and wa-la! It's ready to be stuffed.

9) I had an old decorative pillow that I haven't been using, so I ripped that seam open and used all of the filling for this new pillow.
10) Once I stuffed it to my liking, I closed up the opening at the bottom by hand-sewing it, to seal it up.


I'm so pleased with how it came out. I already have a couple of graphics that I want to use to make pillows for myself.
Linked up to:
How To Nest for Less's Party with my Peeps link party

Creatively Living's Tell it to Me Tuesday link party

Live.Laugh.Rowe's Live Laugh Linky Thursday #2

Too Much Time On My Hands' Get Schooled Saturday link party

The 36th Avenue's Show Me Extraordinary link party

Home Stores A2Z Tutorials & Tips link party

Graphics Fairy Brag Monday link party

It All Started With Paint's Pillowpalooza link party

Posted by http://adventuresindiy1759.blogspot.com/
Love your pillow, I too love to print on fabric and love the graphics fairy.. really cute pillow
ReplyDeleteThanks
Come see me sometime I'd love to have you visit..
Carri
simplydonewright.blogspot.com
So brilliant and so simple! Great job!
ReplyDeleteI'm pinning this so I can remember to do it myself!
Visiting from the Networking Blog Hop and loving what I'm seeing.
I'm a new follower and would love for you to stop by for a visit! : )
~Abbie (www.fivedaysfiveways.com)
I love your pillow... I make pillows like that too and I just love printing on fabric... your pillows are adorable.. I'm a new follower thanks to the Hop Party...
ReplyDeleteCarri
simplydonewright.blogpspot.com
Just found your blog on the Networking Blog Hop & I'm a new follower. I have been looking through your posts - Wow! You have some really great projects. This pillow is so creative, and your kitchen is awesome!
ReplyDeleteI'd love it if you would stop by my blog for a visit, too!
Michelle @ Crazy for Crafts
http://crazyiniowa.blogspot.com/
Just found you on the Networking Blog Hop & I'm a new follower. I've been looking through your posts - Wow! You have some amazing projects! I think I'm going to have to pin all of them :)
ReplyDeleteI'd love it if you would stop by my blog sometime for a visit!
Michelle @ Crazy for Crafts
http://crazyiniowa.blogspot.com/
Great tutorial! I wondered how this was done! Thanks for linking it up @ Creatively Living. This project turned out awesome!!!
ReplyDelete--Katie
Wow! I'm loving your pillows! Your inspiring me!
ReplyDeletePinning it! Thanks for the tutorial!
ReplyDeleteI am your newest follower too! I hope you can visit me sometime:)
ReplyDeletethanks for the tutorial! I'm going to be making a note center in an old frame, and I wanted to use a French transfer for the inside. I wasn't sure how hard it was, so I appreciate the tutorial!
ReplyDeleteHolly
You're welcome! It's actually pretty easy - just remember to reverse your image if it has words. :)
DeleteI actually just did another project using this iron-on technique (I'll be sharing that project soon). Thanks for stopping by!
That came out beautifully! I have been considering something on burlap fabric. I love the look!
ReplyDeleteThank you! I'm addicted to using iron-on transfer papers for projects now. :)
Delete