Sunday, December 30, 2012

2012 Project List - A Review

Since we're coming up to the end of the year, I decided to reflect on my past projects that I have completed or started for this year.  It's good to take a look back and see what I have accomplished and learned.  I think after completing my 2011 project list (it was fairly short) - about 15 things), I got a little overly ambitious for 2012.  Technically, a couple of 2011 projects didn't get completed until this year, but they got done.

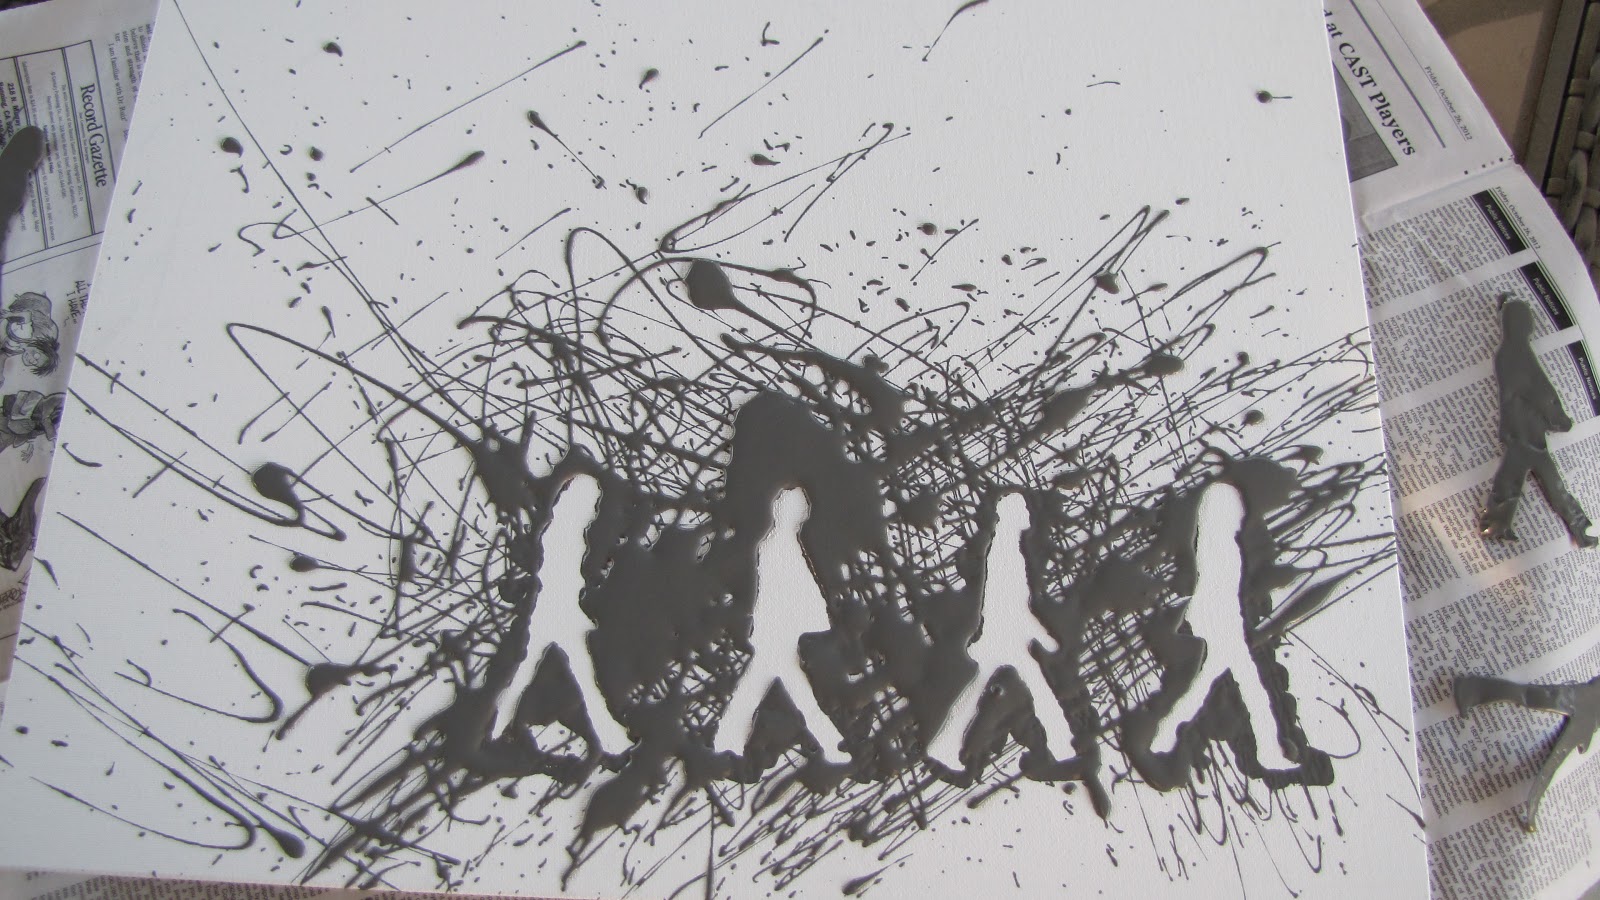
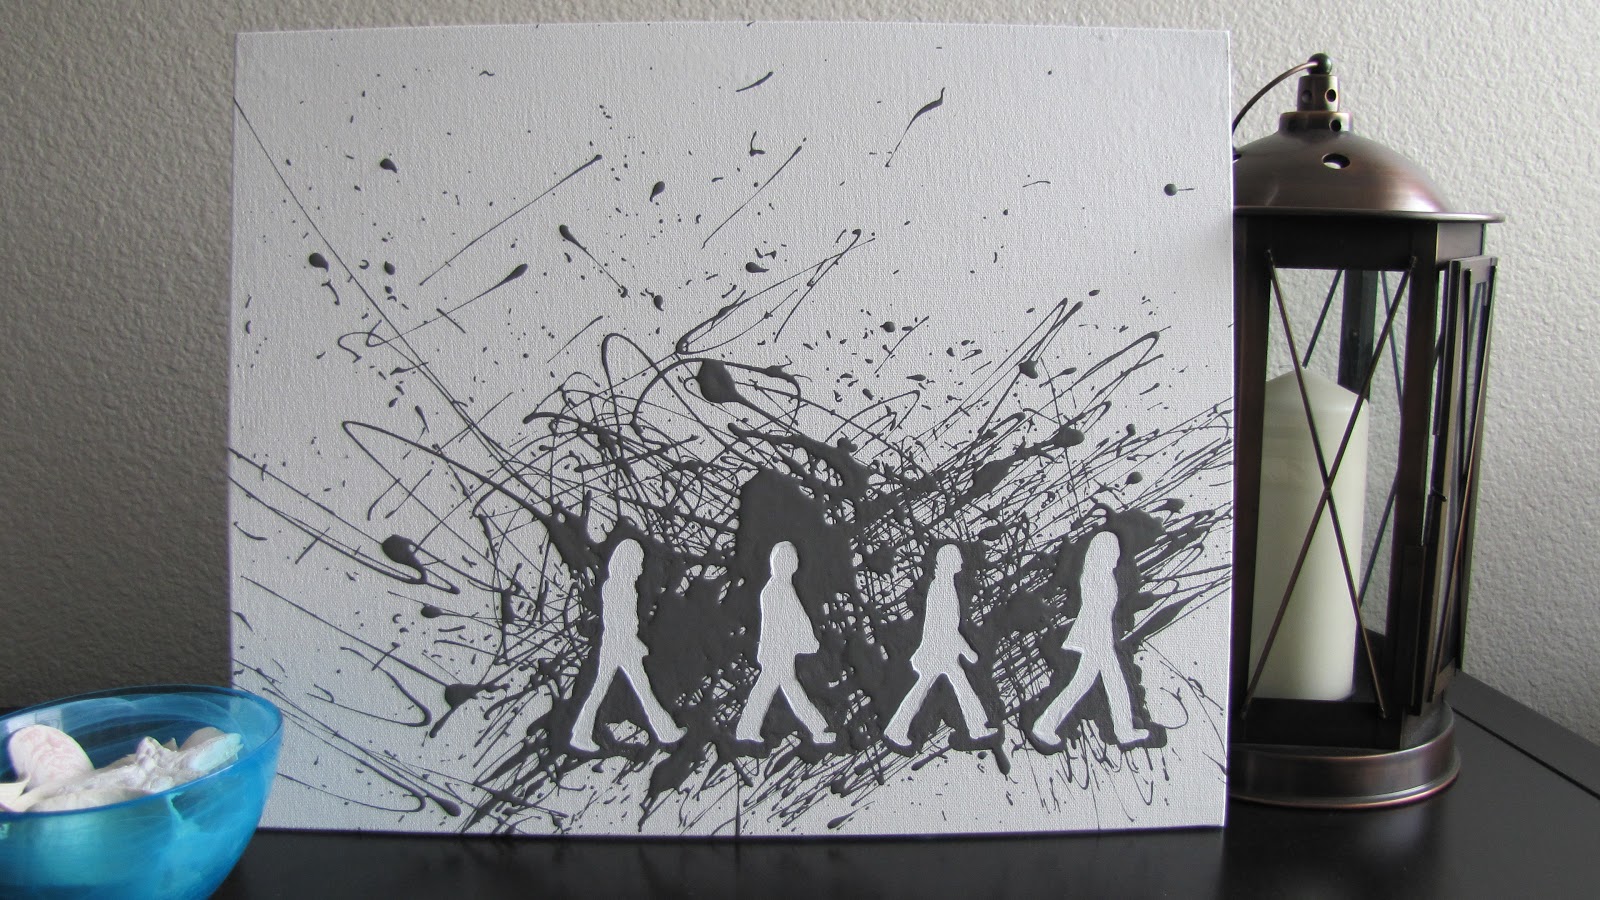
First, before I get started on the list, I want to share my favorite project of the year:
Painting my brick fireplace made a HUUUUUUUGE difference!  I still love it!

My 2012 list?  I'm warning you right now.  It's long.  I kept adding onto the list every time I thought of something.  Sigh.  So, I maybe got about half of it done, which is still good considering how long it is.  Here it is (along with my commentary and links to the original posts):

Doors
  1. Remove paint from interior doors hinges & spray paint them Satin Nickel
  2. Add door stoppers to hinges on all doors
  3. Paint interior doors & trim (both bathroom doors, craft room doors, guest bedroom, master bedroom, hall closet)
Living Room
  1. Paint fireplace white
  2. Make mantel for fireplace - the fireplace looked so good once painted, that I decided to leave it as-is.  I'm still debating if I want to make the mantel that I had in mind for this.
  3. Move stereo to Billy bookcase - this wasn't as easy as it sounds.  The backing of the Billy bookcase wasn't flimsy and I couldn't just slip the cord behind it.  I had to actually remove everything from the bookcase, then remove the bookcase from the wall and drill a hole in the back of the bookcase so I could feed the cord to the outlet behind the bookcase.  It worked out so much better to have the stereo on the bookcase - it's a lot easier to access now.
Craft Room
  1. Reorganize file cabinet 
  2. Reorganize mini-office in closet
  3. Organize instruction manuals 
Kitchen
Cabinets:  not much progress made in here.  The kitchen got lots of attention previously, so I decided to focus on other things.
  1. Put new wheels on kitchen drawers that need it
  2. Reorganize cooking utensil drawer
  3. See if I can utilize the cabinet space above fridge – take off doors and put cookbooks?
  4. Clean really well & then paint on top of cabinets so there is smooth finish (will make it easier to dust and can decorate on top of cabinets)
  5. Put trim back on
Pantry:  although I completed these, I decided that I still need to completely reorganize the pantry. 
  1. Label containers
  2. Reorgnize other items using baskets
Guest Room
  1. Reorganize closet - this is going to be a BIG job, so I have avoided it.  
  2. Repaint over red accent wall 
Garage/Laundry
Big Garage Door:
  1. Put fresh batteries & program the keypad outside so I can actually use it
  2. Fix weatherseal on bottom (missing piece where critters can get in) 
Organize Paint:
  1. Check to see if the paint in each can is still good
  2. Transfer paint to new containers if needed 
  3. Label each container (brand, color, room used in, date bought)
    Paint Can Organization
  4. Reorganize other paint supplies
  5. Find disposal center - I'm still looking for one in my area.
Organize entire garage:  this is a BIG project too, so will be done in phases and will probably take me awhile.
  1. Move big shelves & reorganize
    Garage Organization: Part 1
  2. Clean doors & insides of cabinets
  3. Reorganize inside cabinets by category? Use bins/tupperware/ziplock baggies
  4. Install hooks on walls to hang up bigger tools
    Garage Organization: Part 2
  5. Use white plastic drawers from guest room closet under workbench?
  6. Paint garage walls?
  7. Paint nicer flooring?
Laundry Area:  my laundry is in the garage.  I've been trying to rack my brain to "pretty it up" in there, so it hasn't been completed yet.
  1. Reorganize laundry area
  2. See if I can utilize the Tagi shelf for extra storage
  3. Make laundry sign
Storage:
  1. Organize Christmas lights
    How to Organize Christmas String Lights
Linen Closet - nope, this didn't get done.  It's already somewhat organized, so it's not that bad.
  1. Clean out and reorganize
Outside
  1. Reset sprinkler timer - this had been set incorrectly so lots of water & money were being wasted.
  2. Fix latch on side gate 
  3. Fix other side gate so it will close
    Fixing A Gate
  4. Fix the fence on the side to neighbor's yard
Told you it was long!  I'm sure this is boring for you to read about, but it's a good way for me to see that I got lots of stuff done this year (including things that weren't on the list at all), but obviously I have leftovers for 2013.  And that's fine - because I don't plan on going anywhere anytime soon.  I'll be making a new list for 2013 - I need to tweak the leftovers from 2012 and I've also added a few more things (yikes).  Some of them are big projects, so I need to evaluate and see which ones will be a priority for me.  I work full time, so sometimes it takes me longer to get things done than it may others, but they get done.  Eventually.  :)

Wednesday, December 26, 2012

The Beatles Abbey Road Canvas

Hi there!  Today, I have a different type of craft than I usually do.  It's more artsy than crafty.  :)
Not bad, eh?

I had found this (below) on Pinterest and being a huge Beatles fan, thought it was way cool.
Via Always in Wonder blog
Of course, I immediately thought "oh I can do that myself".  I actually planned to make this as a gift for my brother, who is also a Beatles fan.  Months went by, his birthday went by and I never made it.  So, in November, I finally thought that I should make it as a Christmas gift for him and this would give me deadline to get it done.  I made sure to not wait until the last minute either .  Ya know - just in case it  didn't turn out so well.  :)

Here's how I did it...

Supplies:
*  Canvas
*  Paint
*  Image printed on paper
*  Craft scissors
*  Paint brush (or sponge brush)
*  Adhesive

1)  I Googled images of the Beatles' Abbey Road album.  I happened to find one that was just the silhouettes of them, instead of the original picture.  So I printed it out and using my craft scissors (they were easier to use than regular scissors), I cut the figures out.  I made sure to cut very carefully in case I needed to use the "reverse" stencil.

2)  Once cut, I laid out the stencils/figures, I placed them on the canvas until I got them in a spot that I liked.  I liked the placement of the original that I found on Pinterest, so I used that as my guide.

3)  I didn't have any repositional spray adhesive and I didn't want to use my permanent spray adhesive for fear that the stencils wouldn't come off when it was time to remove them.  So, I used double-sided tape.  This ended up not being a good idea, but I digress.

4)  I searched through my many sample pots of paint and decided on "Anonymous" by Behr.  It's a nice, dark gray color and I figured it would match with pretty much most color/decor schemes.  Using a sponge brush, I just splattered the paint in all different directions.  There was no rhyme or reason to it - I just splattered it until I thought it looked good.

5)  Since the paint was thick in some spots, it was sort of hard to see where the stencils were.  So, I decided to take the stencils off while it was still wet.

6)  If you look closely at the figures in the picture above, you can see that in several spots, the paint leaked.  There were jacked-up feet, hands, heads all over the place.  So, I racked my brain to try to think how to fix them or if I should just go buy some repositional spray adhesive and start over.  Since I wouldn't be able to go to the store for a few days, I decided to just try and fix it - if it didn't work, then I would just start from scratch.  I decided to use my reverse stencil that I had taken the time to very carefully cut out.

7)  I matched the figure on the canvas to the figure of the reverse stencil and taped it into place over the figure.  I also held it in place with my fingers to ensure that it stayed in place.  Using my off-the-shelf Pure White Behr paint, I painted within the stencil with an artist's brush.  It just so happened that this white paint matched the white of the canvas perfectly.  If I accidentally painted "outside of the lines", I just dipped some of the gray paint onto the tip of a wood skewer and touched it up.  It was actually very easy.

8)  Paul went from looking like this...
To this...
It actually looks a lot better in person - for some reason the camera picked up on the glare from the paint and made it look a bit more rough than it really is.  It's not perfect, but much better than how he started out.

George came out looking really good too.

And here is all 4 of them after I touched them all up.

9)  I wasn't sure if my brother would want to hang this or lean it up against a wall, so to give him the option, I added picture hanging hardware. I tend to save extra parts and had this in my stash.  It came with small nails, but they were too long for the canvas - they would go right through to the front.  So, I ended up super gluing it to the back of the canvas.  It worked like a charm - I even tested it out.

Here's the final product.  This is one where it's leaning against the wall...

And where it's hanging on the wall...

I hope he likes it!!  I was actually very, very thrilled with how it came out.  I'm going to make one for myself (eventually), but probably paint a nice chevron background.  But, I'll definitely need to go buy that repositional spray adhesive first!

I hope everyone has been enjoying the holiday and time with their families!  And as always, thanks for stopping by.

originally posted by http://adventuresindiy1759.blogspot.com/

Linked up to:
Homework's Inspiration Board link party

The DIY Dreamer's From Dream to Reality link party

Smart School {House} & The NY Melrose Family's Whimsy Wednesdays link party

Home Stories A to Z Tutorials & Tips link party

Lil Luna's link party

House on the Way's Twirl & Take a Bow link party

Live Laugh Rowe's Live Laugh Linky link party

House of Hepworths Hookin' Up With HOH link party

A Bowl Full of Lemons One Project At A Time link party

Delightful Order's Delightfully Inspiring link party

The 36th Avenue's weekly link party

One Artsy Mama's Shine On Fridays link party

Tater Tots & Jello Weekend Wrap Up link party

Too Much Time's Get Schooled Saturday link party

Creatively Living's Monday Funday link party

Liz Marie Blog & Love of Family & Home's Make It link party

Tuesday, December 25, 2012

Merry Christmas!

I know not everyone celebrates Christmas, but I sure do.  So, I wanted to wish you all a very, very Merry Christmas!

Sunday, December 23, 2012

Painted Pinecones

Hello, hello!  I have another Christamasy craft to share with you today.  My bff's 4 year old son kindly collected some pinecones for me over the summer on their trips to the park.  I've had them for a little while and knew exactly what I wanted to do with them.  Quite awhile ago, I had watched "Sarah's Holiday Party" with the wonderful Sarah Richardson (and her amazing assistant, Tommy - my bff and I love him.  My bff says she needs someone like him to tell her like it is.  She's a bad decision-maker and item-returner.  But, I digress....).  In the special, they paint pinecones by putting a mixture of paint & water (just a bit of water) in a tupperware container and shake, shake, shaking it like a polaroid picture. The colors she used were great and I wanted to do something similar.  

So, here's my attempt at this project.

First, get your pinecones.

Then, get a plastic container with a good lid on it.  I used this one below.  My sister owns a Thai restaurant in town, so sometimes I bring home soup leftovers in this (I save the containers - I have plans for them and they also come in handy for projects like these).

Next, pour some paint into the container and add a bit of water.  Adding water makes it less "gloppy" as Sarah Richardson says.  But, make sure not to put too much water  - if you do, the color won't be as vibrant and will give it a washed look (this is what happened to the white ones I did - they had more of a white-washed look, which is nice, but not really the look I was going for).

Put your pinecone in the container with the paint, close the lid (make sure it's on tight so it won't leak) and shake it real good.

When the pinecone is covered really well with the paint, take them out of the container.  Sarah Richardson used tongs.  I just used my fingers.  Then, place them on wax paper to dry.
(Sorry for the poor night-time picture)

Here's an example of how the white pinecones came out - see how they have a white-wash look?  Not bad, but not exactly how I wanted it.

And here there are again, all done and displayed.


I wouldn't say it was a project fail because they came out pretty decently.  But, after I re-watched Sarah's holiday special and found the below picture online, I decided that I really like these other colors and the vibrancy of them.  Next year, I'll be re-doing them to look like these.
source
I was trying to use what I had on-hand and not buy any additional supplies, but, I think I'll have to add some of these nice vibrant colors to my stash for little projects like this.

Thanks for stopping by!  This will be the last time I post before Christmas, so have a wonderful holiday!

posted by:  http://adventuresindiy1759.blogspot.com/

Linked up to:
Too Much Time's Get Schooled Saturday link party

The 36th Avenue's link party

Tater Tots & Jello's Weekend Wrap Up link party

Homework's Inspiration Board link party

The NY Melrose Family's & Smart! School House's Whimsy Wednesdays link party

Delightful Order's Delightfully Inspiring link party

Live Laugh Rowe's Live Laugh Linky link party

One Artsy Mama's Shine On Fridays link party