Sunday, August 28, 2011

Kitchen: Ikea Handles & Window Treatments

I finally completed two of my kitchen projects: curtains & handles.  They really didn't take a whole lot of time to actually do, so I'm not sure why I kept procrastinating.

Curtains:
I've had the fabric since May.  I specifically waited until Joann had a 50% off fabric sale and I bought fabric for the kitchen curtains, the master bedroom window seat cushion, and the hallway bench cushion (the cushions have not been completed yet.  See?  Procrastinator).  So, it took me a little time because I wanted to get some curtain rods and put them up first so I knew what size I needed to make the curtains.  I had a bit of issues with the curtains rods here and here.  I originally couldn't find rods short enough, so I put the brackets up and was going to cut the cheap Walmart rods that I bought down to the right size.  But, that turned out to be more of a pain that I thought.  I ended up finding rods at Bed, Bath, and Beyond in the correct size and got them up really easily.  Once I did that, I started working away at the curtains.  Boy oh boy - I sure can't sew in a straight line to save my life, but they came out fine and you couldn't tell that they weren't sewn perfectly straight.  So, I put them up and this is how they looked.
Hmmm...something just wasn't right.  They looked more like a tapestry hanging.  I decided that the it needed to be "scrunchier" at the rod pocket.  I had some extra fabric leftover, so I took out all the sewing I did on both of them and sewed on the extra fabric to both.  Then, there was the issue of a seam showing on them from where I added the extra fabric.  I decided that ribbon would be good to cover it and used iron-on fuse tape to attach it to the fabric.  And let me tell you - it was a historic week!  I used my sewing machine and iron all in the same week!  Anyways, that seemed to work really well.
I also added small hooks on the side to use as holdbacks for when I wanted to have the curtains open (I tried regular holdbacks, but they were too big for the walls since the windows are on angled walls).
AFTER
I really like how you can see the light through the curtains - some light still manages to get inside the room, but there's still privacy.  (please excuse the mess on the counter).

BEFORE
You can see how plain the window treatments were before.  The mini blinds were aluminum and they were very dirty, dingy, and bent in some spots.  They were also a pain to put them up & down and the strings were very gross and dirty. 

Handles:
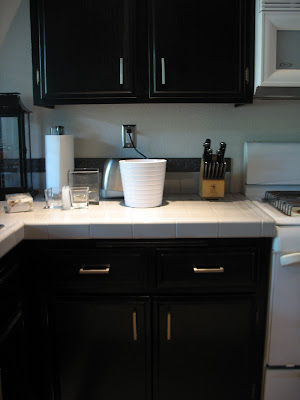
So, I was looking at old posts and I can't believe this project has been going on since the end of May!  3 months? What the?  But, in my defense, there were problems that were a bit out of my control.  First off, the screws that came with the handles weren't long enough to go through the drawers & doors and into the handles.  When I went to Home Depot to find the right screws, they were not helpful at all (they usually are - I guess that's what happens when you try to ask someone who is about to go on lunch break).  I also tried drilling a bigger hole from the inside of the drawer to get the screw to go in further, but that didn't work because the face front was hollow and one of the screws fell inside and I couldn't get it out.  So, the project was put on hold until several weeks later I saw someone's blog post about True Value and remembered that there is one just a few minutes from my house.  Off to True Value I went and lo-and-behold, they had the right screws (I learned that I needed Metric screws), but they didn't have enough in both sizes that I needed.  So, they had to order them from their "guy" that comes in to place the orders and that actually took about 2 weeks (it's a small, individually owned True Value, so I guess that makes things a bit slower.  And I can't use coupons - bummer!).  Anyways, I had put all of the handles on that I could until more screws came in.  I finally got them once they arrived (shout out to True Value in Cherry Valley for being so helpful when Home Depot was not), but of course I procrastinated in putting the rest of them on.   My excuse was that it was going to be a pain because the only cabinets I had left were the really high ones in which I would need to actually get on the ladder.  So, anyhow, I forced myself to do them the other night and it actually wasn't as much of a pain as I thought.  I'm just so glad they are done now!
BEFORE
AFTER
(Again, please excuse the mess on the counter tops).  They aren't perfect and some are even a little crooked (and yes that bothers me), but I'm so happy that they are finally done!  And in case you're wondering, I got the handles at Ikea and are called "Metrik" (I wonder if they named them after the Metric screws that are used with them?).  Oh and here's the template I made to help with drilling the holes.
I used the bottom set of holes (the top ones weren't quite right).  I also made a template for the drawers (this one is for the cabinet doors).
I have heard that Ikea sells templates for a few bucks.  I wish I would have known before I put them up because I think my template was a little "off" (and why some of them came out a bit crooked).
And here's what the cabinet color used to look like:
One of these days I'll post a before & after of the entire kitchen.  Unfortunately, the pictures might not be so great - my kitchen is a bit small and not an open concept kitchen, so it makes picture-taking in that room a bit difficult.
Anyways, I'm glad these are finally finished and now I can move on to my next project!

Sunday, August 14, 2011

Adventures in Gardening: the Black Thumb

A few months ago, I caught spring fever.  Which was really weird because I definitely don't have a green thumb.  But, I tried anyways.  I bought a Home Depot gardening book and did lots of research on line.  I dug up an ugly bottle brush bush and replaced it with a hydrangea plant.  Well, I guess I didn't read the part that I should make sure not to get water on the actual flowers because after the first couple of days of watering, I noticed that the leaves on the flowers started turning brown.  I had burned the leaves.  Sigh.  Maybe it will bloom again later.
I also planted these succulents to have some greenery inside the house.  I read that they are very easy to care for - they need very little water.


But apparently one day I gave them too much water because this is how they look now.
Yes, that blob of a thing in the middle was once that pretty green flowery succulent.  :(

I know, I know.  How could I possibly go wrong with these?  The red cactus appears to be fine, but where it meets the dirt - the stem is brown and it's almost breaking off.  I feel so sad for my plants.
 
However, on the positive side, when I bought my house, it did come with some plants & flowers that were very low maintenance.  I haven't had to do anything to them except leave my sprinklers set to regular watering and occasional pruning.
Before
After
Look at how many flowers bloomed on that agapanthus!  After I took this picture, even more little ones grew at the bottom - probably about 6 more.

These calla lilies didn't even start growing until this year and I've had my house for 2 years!  They're so pretty and bloomed like crazy.
I pulled these onions (there were tons more too) out of my backyard.  I was pulling some weeds and these were in a patch of them.  I didn't even know they were there! (No, my garlic wasn't growing purple flowers.  The garlic was growing in between 2 of my society garlic plants).

And somehow, I've managed to keep this delphinium going strong.  It got so tall and bloomed several times with huge, pretty purple flowers.
I had some gerbera daisies that started out strong in early spring, but petered out very quickly.  I think our crazy spring/winter weather l that we had freaked them out.

So, it seems anything new I've brought to the house isn't doing so well.  I guess I'll just stick to the ones that were already here.  And when I have the patience again, I'll try my hand (thumb?) at the whole gardening thing again.

Saturday, August 13, 2011

Pillow

I haven't posted anything in awhile - this heat has been sucking the energy out of me.  But, I did manage to work on a couple of projects.  I had finally made some curtains for my kitchen, but didn't really like how they turned out, so I'm in the middle of tweaking them.  So, here is a little something in the meantime.  I have been wanting to update the pillows in my house, but need to do it fairly economically.  I bought a small pillow form and some kitchen towels - using those I whipped up a cute little pillow.
The towels I bought came in a set of 3 for $3+.  They were white, black and the tan one I used for my pillow.
Final product
When I originally bought the towels, it looked like the stripes were in the middle, but they were actually on the edges.  So, I had to tweak my original plan, but I'm really happy with how it turned out.  I have a nice little accent pillow now.

Linked up to:
It All Started With Paint's Pillowpalooza link party